
Project Lockdown Aviary Build
The country is in lockdown, I’m on PTO, my vacation was cancelled and I can’t leave the house. However, the weather is glorious, I can be in the garden, the postie is still working and Amazon is delivering. It was the only sensible thing I could do. I bought a welder and built some stuff.
The Plan
Since we moved into this house the big birdies have been living in the back room, which has a South-facing French door that opens onto the patio. It’s lovely, but the large amount of glass and the flat roof of the extension means it gets extremely hot in this room in the summer time and we can’t open the door without locking the birds away. It means we have to choose between the birds’ freedom to roam the house and our own comfort.

So we had the idea of building an aviary over the French door so that we can open it and let some breeze into the house without worrying about the birds. Cancelled vacation plans mean I can bring this project forward from Q5 where it was previously scheduled. It is possible to buy pre-fabricated aviary panels of course, but in every case we found they suffered from one of two problems:
- Size – Most commercially available aviary panels are either 6 feet or 8 feet tall. This is problematic because the strip of wall between the top of the French door and the eaves of the roof is a height above the patio that is somewhere between those two dimensions, so the top of the aviary would either interfere with the doors opening or intersect with the eaves. It’s possible to get bespoke units made, but that increases the cost, especially when you require they be made of a specific material, which is the other problem:
- Material – The majority of aviary panels commercially available are either wood-framed or zinc-galvanised. This wouldn’t matter at all if you were keeping chickens for example, but both of these materials are a problem for keeping parrots and other hook-bills. Parrots are prodigious chewers, which is vital for the maintenance of their beaks but anything made from wood has a short life-span in our house. Galvanised metals are a problem because parrots are also prodigious climbers and they use their beaks as a third hand. Just from climbing about in galvanised cages parrots can ingest a lot of zinc, which is quite toxic. It’s why you should never make a BBQ out of metal fencing mesh – it’s almost always zinc-galvanised and you will get heavy metal poisoning.
Instead of paying for bespoke panels, obviously it would be way more fun to learn how to weld and fabricate my own. 😀
The two most ideal choices for material are aluminium or stainless steel. Either of these should survive outside corrosion-free, maintenance-free and be both safe and secure for the birdies. Reading online I learned that for various reasons, welding aluminium is a much more dificult process than welding steel. The thermal and electrical properties of steel make it a surprisingly forgiving material to work with, which is why most novice welders begin there.
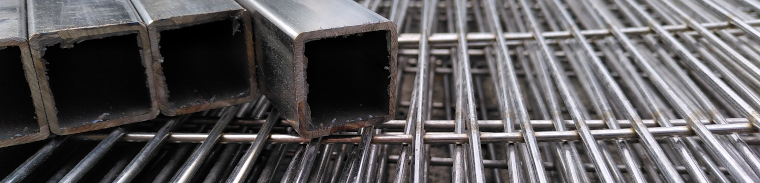
So even though the raw material is roughly twice as expensive as aluminium I decided that I stood a much better chance of success by constructing the aviary from stainless steel. I ordered some sheets of 8 feet by 4 feet sheets of stainless weld-mesh, with wire spacing close to that of our existing bird cages, from a supplier in Ilkeston and found a great deal on some 3 metre lengths of stainless box section from a local supplier here in Sheffield. I had great experiences with both these suppliers and would definitely use them again in the future.
I also ordered a cheap welding machine from Amazon, some PPE and a stack of consumable electrodes. I was now committed.
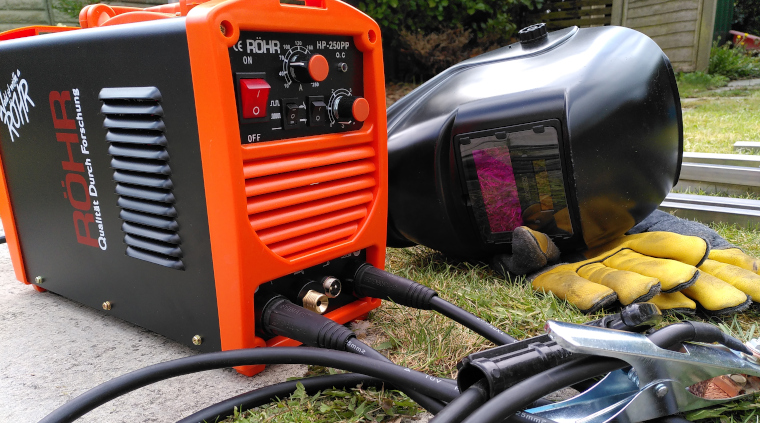
The welding machine I ordered has the capability to do both TIG welding and manual arc welding but since TIG has a much higher initial cost of entry due to the requirement for argon shielding gas, I decided to stick to basic manual arc welding for this project. The consumable electrodes I bought are designated ER308L and are suitable for welding the type 304 stainless steel I had ordered.
Phase 1 - First Arcs
Time to start welding!
I sensibly ordered enough box section such that I could first get plenty of practice before attempting any part of the real project. Here are photographs of my very first eight arc strikes, as seen after a quick hit with a wire brush (click to view a high-res version):


It’s quite obvious that I neither knew what I was doing nor knew what to expect, despite having watched several Youtube videos on the subject… 😲 I’m a big fan of my apparent complete inability to move my hands in a straight line and also the apprentice marks that can be seen in sample one where I had welded the electrode to the base metal and then dragged the arc across the surface of the piece after struggling to break it off.
Phase 2 - Butt Joint Practice
After a full day of just striking arcs and forming puddles, I wanted to try welding some pieces together by butting some box section together to form a tee. This is the kind of joint I want to use on the aviary panel frames. Here are the front and back sides of my first ever box section butt joints (click to view a high-res version):

You can see from sample one here that I had great difficulty in managing the heat that I’m putting into the metal – on the left I did not manage to form a puddle that joined both sides of the joint (not enough heat/moving the electrode too quickly) and on the right I ended up just blowing a hole clean through the box (too much heat/moving the electrode too slowly.) Sample two is a little better, but there is still a hole on the left that is filled with slag instead of metal.
I ended up spending a lot of time discovering through trial and error the right way to move and feed the electrode for this kind of joint of this kind material and by the end of day three I actually started to produce some welds that came out looking sort of not bad (click to view a high-res version):


The key thing I found to get these welds was that as you zig-zag across the seam to be welded, it is important for the electrode to spend much less time over the bottom end piece than the cross piece because the end piece has no support from underneath. The bottom edge of the cross piece of the tee is supported by a whole side of the box section and can therefore sink away much more heat, which means less chance of melting a hole right through the material.
Pretty welds they are not, but I tested the strength by welding only one side and then trying to persuade the pieces apart with a hammer; I succeeded in bending it apart at the seam only a little. The welds can easy support my body weight and it’s not for anything structural; it should be more than stong enough for what I have in mind.
Through experimentation I have found the beginnings of a technique and independently discovered the rule of thumb that states the machine should be set to the same number of amperes as the thickness of the electrode in thousandths of an inch. My electodes are 1.5mm, which translates to about 60 amps. I also discovered it helps a great deal if you can actually cut the metal squarely. I don’t have a metal-cutting chop-saw or band-saw so I’m just cutting the box section using an angle grinder with an abrasive cut-off disc and then squaring up the pieces on the bench grinder (or hand file where the bench grinder is impractical). Perhaps it’s obvious, but the closer the fit, the smaller the gap you have to fill.
Later, I started to attempt fillet welds in the inside corners of the tee, but that… Didn’t go nearly as well (click to view a high-res version):

I clearly need way more practice at this; I’m not anywhere near confident enough to do fillet welds on the real panels, so for now I’ll probably do the flat welds only.
Phase 3 - Going into Production
At some point you have to just draw a line in the sand and actually build something for real, so the next day I started cutting the box section to length and figuring out the clamping setup. Here you can see I am leaving some sections a bit long to make it easier to clamp together squarely at the corners of the panels. Once welded, I could flush-trim the excess off with the angle grinder.

And once I’d welded the first frame, I could use that as a kind of template for the subsequent ones. But even with a template it was still difficult to keep things square due to the warping as each weld cooled down and the metal contracted. Even just one degree off is actually quite a long way out across nearly 2.5 metres of box section… You just can’t have too many clamps holding it place.
I knew I wanted the weld mesh to sit flat atop the frames so I needed to grind flat my ugly, lumpy welds. A flap-disc on the angle grinder makes short work of that (click to view a high-res version):


I didn’t quite grind out the deepest divets because I didn’t want to remove more material than necessary but even so, I was able to hide a lot of sins with the flap-disc. 😀
Phase 4 - Test Assembly
Once I had all the side panels and roof panels of the aviary welded up, I could start thinking about assembly. I needed to drill some holes in the box section so that it can all be bolted together. This turned out to much more of a chore than I anticipated. Stainless steel is hard as nails and the drills I had were not really up to the task. I had some titanium nitride (TiN) coated high-speed steel (HSS) drills for metal but they required re-sharpening on the bench grinder after every single hole, even though the wall of the box section is only 1.5mm thick. If I did not resharpen the drills then the friction of the dull cutting edge would work-harden the steel and they would would just bind and break. I broke three drills in this way before I caved in and ordered some cobalt HSS drills designed for stainless, which cut the metal like butter in comparison to the others. I highly recommend getting cobalt drills if you have to work with stainless steel.
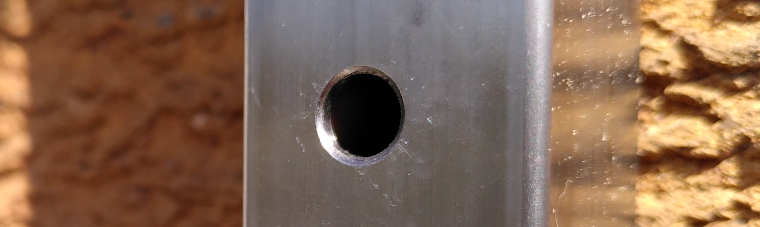
I drilled 6mm holes for M6 bolts and removed the burr by creating a slight bevel with a countersink bit:
With sufficient bolt holes drilled, I could now do a dry fit of the first segment of the aviary so I could mark and drill holes in the brick-work for the mechanical fixings attaching it to the wall. The half-fabricated frame clamped to the front here is just there for spacing and to lend some rigidity for the test fit:
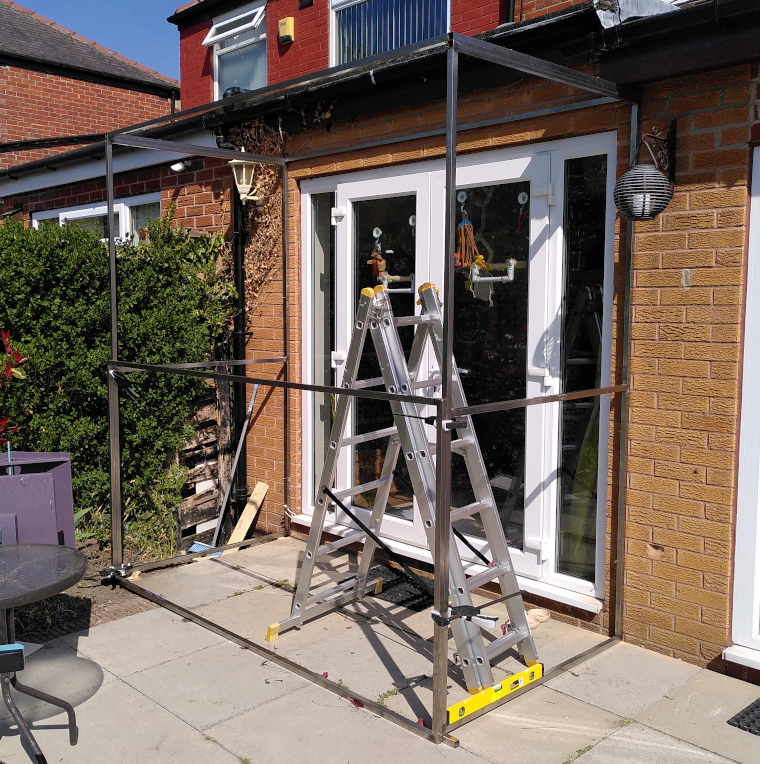
And it turns out I needn’t have worried too much about squareness because once I bolted the frames to the wall of the house, I discovered my patio is pretty far from level. I am as shocked as you are, but at least I know the rain water drains away from the wall. The side of the frame that is bolted against the wall is resting on the patio. The other side is flapping about in the breeze, a 25mm gap between the underside of the box section and the top of the patio (click to view a high-res version):

Luckily since the gap is approximately one box section dimension large it should not be a big deal because the next frame can be that much lower without resulting in any gap at the top.
Phase 5 - Welding the Mesh
Next thing to attempt is welding the mesh to the assembled frames. Prudence once again dictated that I practice on some off-cuts first, so here’s some practice welds (click to view a high-res version):


What I am trying to accomplish with these “tacks” is to start a puddle on the box section and then bringing the puddle over to touch the mesh wire. I must be careful to avoid putting too much heat into either the box section (and blowing a hole through it) or the mesh wire (and melting it away entirely). You can see in the above I was not quite successful in all cases, but after some practice I was able to acheive what I wanted consistently enough to start welding for real. See below for some better examples (click to view a high-res version):

Now only about a thousand of these left to do…
Phase 6 - Final Assembly and Gate
After fabricating and welding the mesh onto seven frames, the final frame I wanted to be a gate so that we can still get into and out of the aviary from the outside. This meant I needed to construct some kind of latch mechanism to keep it closed. For the hinge side, I just bought and attached some stainless rise-and-fall hinges, so the gate will naturally want to close itself. For the latch mechanism, I fabricated a small enclosure out of some box section and cut out the mesh where it would be placed in the gate (click to view a high-res version):


This enclosure will house the latch tongue, handle and return spring. I had to buy the spring, but the latch tongue and handle I made from some stainless steel round stock:

The holes you see drilled in the enclosure above holds the latch tongue captive. The spring surrounds the latch tongue and acts on the latch handle to force the tongue into a corresponding hole in the gate frame, as demonstrated below:
Demo of the gate latch mechanism.
I tried to fix the handle to the latch tongue with a set screw, but of course this stainless steel was too much for my cheap taps and I inevitably snapped the tap mid way cutting the threads:

I don’t know what I expected, I almost certainly should have just used a roll pin. Never mind, I just trimmed off the pointy excess and now the tap is the set screw. 😀
I also needed a “door stop” to prevent the gate from being opened backwards and straining the hinges. This was easily made with a piece of stainless sheet metal salvaged from an old cooker extraction hood pop-riveted onto the frame:

Epilogue
I was right, learning to weld was a great deal more fun than just buying some custom made aviary panels. The whole project took my two full weeks of PTO working every day, plus something like the next six following weekends, so it was expensive and laborious but a great learning experience.
Due to assembling the aviary with the mesh welds on the outside, the only welds you see from the inside are ones that are ground flat which I think looks great. And the birds seem to enjoy having the extra space too:

This guy especially loves taking showers out there when it rains:

In this time of crisis, I leave you with this appropriately heartwarming message that came with my welding gloves:
“The last but most important, please don’t forget to take a good rest and spend time staying with family in busy work.”